How to Train Your Flock to Use Lil’Clucker Cups
Summer brings sunshine, overflowing garden beds, and long, lazy afternoons in the yard. But for backyard poultry keepers, it also brings one relentless challenge: keeping your flock cool and properly hydrated in the sweltering heat.
If you’ve ever stepped into the coop only to find a flipped-over water bowl, muddy puddles soaking the bedding, or poultry panting with open beaks in the midday sun, then you already know how serious summer hydration can be. In this post, we will walk you through exactly how to train your flock to use the Lil'Clucker automatic waterer cups so they stay cool, hydrated, and healthy all summer long.
Understanding Poultry Behavior First
Before we get into the training methods, it helps to understand how poultry interact with their environment, especially where water is concerned.
Poultry don’t instinctively recognize every object as a water source. They learn by observing, pecking, and exploring. Most poultry associate shiny surfaces, movement, or sound with water. That’s why still water in a cup might be ignored at first. Your goal as an owner is to help bridge that learning gap gently, consistently, and with a little strategic encouragement. Here’s how to set up your watering cups for success:

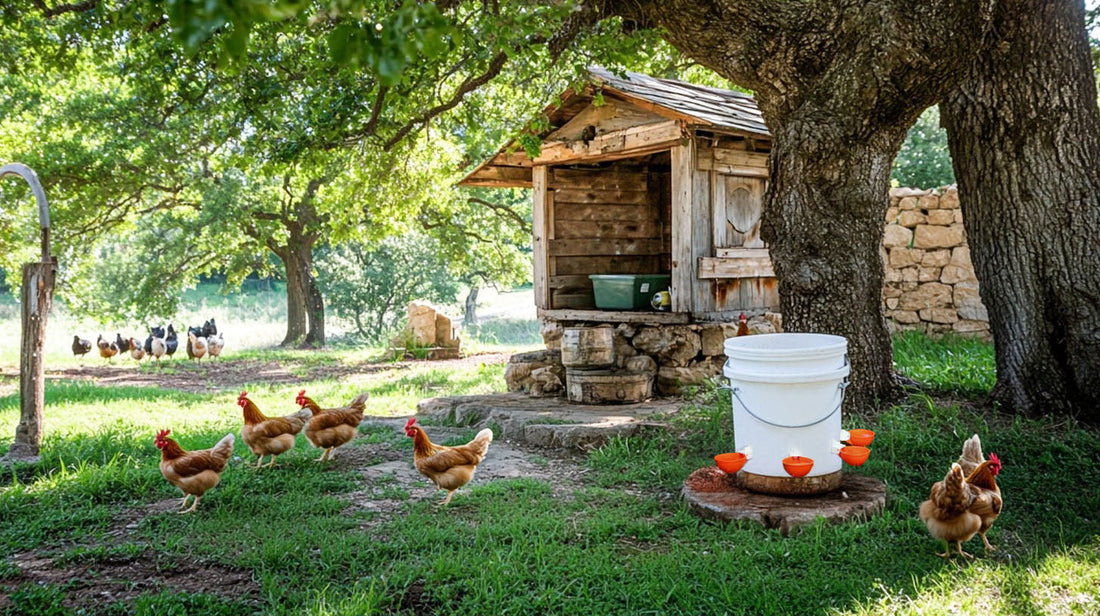
1. Install Watering Cups the Right Way
Start by installing the watering cups in a shaded area, out of direct sun, so the water stays cooler.
-
Mount cups at shoulder height for your smallest birds. They should be able to reach forward comfortably, not stretch upward or stoop down.
-
Attach them to a clean, covered water source (like a shaded 5-gallon bucket or PVC line).
-
Ensure the water line or container you’re using is full and that water flows freely into the cups.
Bonus Tip: For DIY waterer containers, add frozen water bottles inside for an easy DIY cooling hack!
2. Prime the Cups to Spark Curiosity
Right after installation, manually fill each cup with a little water before showing them to your birds. Seeing the reflective surface of water helps your birds recognize the cup as a drink source.
-
Gently splash your finger in the cup to create ripples.
-
You can even rub a little fruit juice around the lip of the cup to make it more interesting, like a watermelon or cucumber.

3. Use Beak Dipping for Gentle Introduction
This is one of the most effective and natural ways to teach poultry how to drink from something new, especially for younger or heat-stressed birds.
-
Carefully pick up a poultry and bring him to the cup.
-
Gently dip just the tip of his beak into the water, then let him go. Just enough to sip and understand it’s a water source.
-
Release him nearby and watch him return to the cup on her own. He’ll usually turn back to sip again on her own.
Do this for a few birds, especially your alpha hens or most curious pullets, and the rest of the flock will follow their lead.
4. Make It a Gradual Switch
To avoid dehydration during the transition, we still recommend keeping the old water source available. Poultry doesn’t like surprises, especially in extreme heat. Instead:
-
Leave both systems in place for 24–48 hours.
-
Observe whether your birds are exploring and using the cups.
-
Continue gently guiding any hesitant birds with beak dipping.
-
Once you see several birds using the new cups, you can safely remove the old ones.
-
Keep monitoring during the hottest parts of the day to make sure no one is struggling to adjust.

5. Pair Training with Treats
If you have hesitant or stubborn birds, combine training with hydrating treats for double the benefit. Treat-based training not only works, it builds positive associations with the new system.
-
Hold a juicy treat or cold fruit like watermelon, cucumbers, or berries just above or next to the water cup. (Poultry often sip while they snack, making the water cups part of their happy routine)
Pro Tip: Freeze diced watermelon into small cubes and scatter near the cups for hydration meets enrichment.
6. Watch Closely and Tweak as Needed
Over the next couple of days, spend a few minutes watching your flock interact with the cups. Look for signs of success:
-
You see birds returning to the cups on their own.
-
The water level in your reservoir drops over time (a good sign they’re drinking).
-
Bedding under and around the cups stays dry—proof of a cleaner, more efficient watering system.
If a bird still hasn’t figured it out after two days, repeat the beak-dipping and treat method and gently monitor her hydration. Occasionally, one bird may need extra reinforcement.
Training poultry to use Lil’Clucker automatic watering cups isn’t difficult, but it does require a little patience, a sprinkle of creativity, and maybe a few embarrassing flock impressions. It’s a short learning curve that pays off in cleaner water, healthier birds, and a happier you.
By combining proper setup, gentle guidance, and natural flock behavior, you’ll have your birds sipping confidently in no time.
Clean water on demand + happy, hydrated hens = one cluckin’ smart upgrade.
Show off those hydrated hens and post your success on your socials! Don’t forget to tag us and use #LilClucker to join our flock of modern poultry pioneers.
💬 Got Questions or Tips? Or Want to Share Your Training Saga?
Chick-Chat With Lil’Clucker
Join our private Facebook group to swap ideas, photos, and first-hand advice on Lil’Clucker gear! from fellow poultry owners and the Lil’Clucker team! 🐓💬


